June 2, 2013

Weeks 5 to 9, from the pendulum to the vanilla walk


Hey guys, long time no see. Here are 2 awesome videos Francis, an alumni from AM suggested me. They are a bit long but it's well worth it.

Oookay, I did let a bunch of posts accumulate hehe. Almost done with the first class, man how time flies, Already at the start of week 11. I'll just try to do it by chunks like last post. 
So here we go:

WEEK 5: 

In week 5 we had to do a devastation pose and the pendulum animation to learn about overlapping action. The video I mentioned in the last post is a great way to start.

Devastation is a very extreme form of sadness, after looking for a bunch of reference (suggestion: look for pictures of war and of people who lost everything on a natural disaster, its quite sad though).

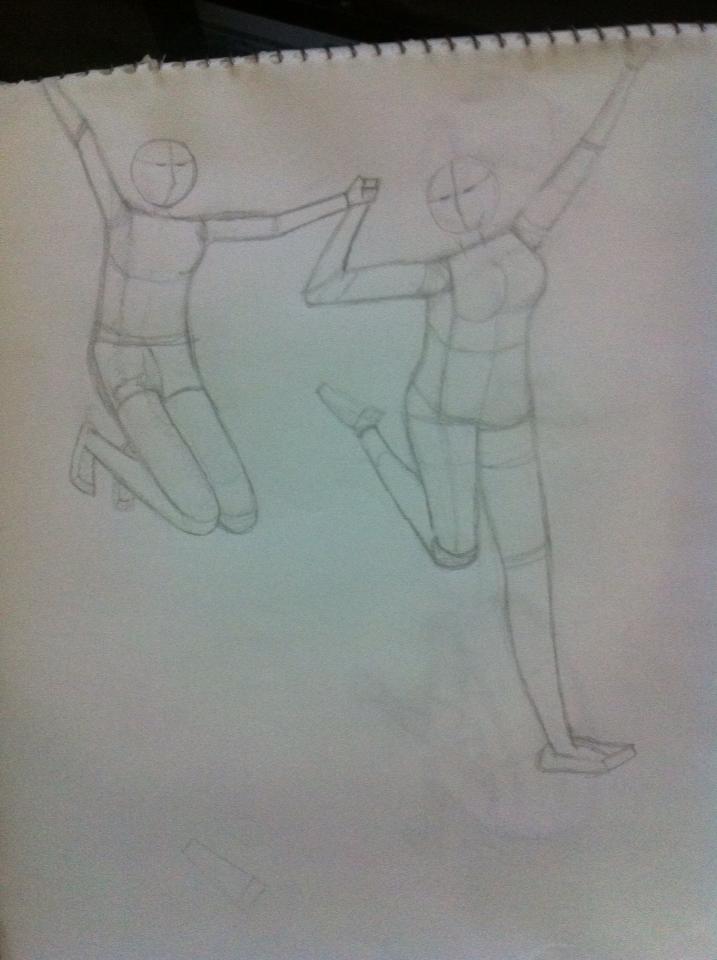
Here are my sketches for this week:


I was between number 6 and 10 for the 3d pose so I did some tests and came up with these:


My class mate Gabriel called the first one "sexy devastation" lol. Anyway, two of my classmate really liked the bottom one better (and today I kinda agree with them :P) but I went with the sexy devastation pose. My mentor had some reservations about it and suggested some great changes to help make the meaning of the pose stronger. Something we always have to remember is the order of importance of the pose. 1st the meaning, 2nd the body mechanics and lastly design.

Here is my pendulum assignment planning:


I wanted to give a little personality ti it so created a little obstacle. He evades falling rocks to get to the exit. Here is the final animation:


The problem areas were the ones with rotation on the base, the chain needed extra attention so it doesn't appear to be locked in place. Another note was at the end where the chain moved too much on the anticipation. My mentor said that it was up to me to do a revision.

Here is the revision:


He liked the new results but is not a fan of the 3/4 view on the anticipation of the object.

Overlapping action is a important principle that will make your animation much more organic. I suggest looking into the Preston Blair book and the Animation Survival Kit for more in depth info. The important thing is to take notice how the main body movement affects the other parts. In this case the chain. It's all about breaking the joints correctly and copying curves (in 3d).

WEEK 6:

Yay, tailor assignment!!
No poses this week, sadly. This is the assignment that combines everything we learned so far, so we are supposed to show good control of overlapping, stretch and squash, timing, spacing...Its a bouncing ball combined with the pendulum, and its alive too. I as very exited to do this, so much that I went a little overboard and put too much into too few frames (our frame limit was so little :P).

Here is the plan:


So the idea is that in 5 sec, little Tailor  comes to the edge of the branch looks down, threatens to jump, enters a big anticipation and jumps. Big Tailor is coming see that little tailor is about to jump, he jumps back scared, jumps to the edge of the cliff, prepares to jump and jump rescuing the little one landing on the other side. I know, quite a lot of story bits in just 5 sec. What can I say, noob mistake lol. 

Here is the animation:


My mentor said just that, too busy, too much going on and the story beats was too similar to one another. But he liked the overlapping of the tail and the movement of the body. So as that is what really counts in this assignment he let me keep this little story, just asked me to change a few things like increasing the height of the tree so little tailor can fall for more time, some tweaks on the tail including a comp inbetween that I failed to see on little tailor. He let me go over the frame limits to make a few adjustments to the big anticipation of big tailor too. But that is for the next week hehe.

WEEK 7:

This week we just had to refine our tailor animation so it was a slow week, here is the result base on my mentor's note:


I was so glad he found that my adjustments improved the shot. I changed a few things besides of what he asked to help break the story beats a little. In the end I was quite satisfied with the result, I know and understand now the importance of restrain and the many mistakes I made story wise taught me many things. Sometimes more is less... To try to put so much in there the audience wouldn't be able to see it all and sometimes the meaning of the scene will be lost. So it would be better to let little tailor just hanging in there about to fall and to focus on the big tailor action, driving the audience to see his desperation and finally rescue. But I digress, this is more of a class 3 and 4 thing. I'm really grateful that my mentor took the time to teach me this and to point it out. 

Loved this week, learned a lot from this.

WEEK 8:


Guess what? Poses are back in the game till the end of class now :)
This week is strength pose and blocking a vanilla walk. 

Let's start with the poses, here are my sketches for week 8:


Chose sketch number 2, here is the result in 3d:


This time I focused more on the idea and less on design and it showed on the critique. My mentor said the idea was correct the main problem with this is the silhouette. He gave me a bunch of tips to make this more clear. I'll post the results on a later date.

Here is the plan for the animation:


This plan is more like a 2d way of doing it, today in 3d we could put the extreme of the rotation x of the body on the frames 0, 6 and 12 so it creates a nice overlapping.

Here's the blocking:


Notice the movement of the hips as the leg stretch in the passing position the side of the hips for that leg goes up. That movement became clear to me when my mentor said to see how a quadruple walks and how its hips behave.
A good way to measure the distance your character is going to walk in translate z is to get the values of the the tz for both legs, add one to the other and that's how much your body should move in one step. Really simple when you think it like this. Remember that the curve for the Tz of the body should be linear. 
This is for when you are doing pose to pose animation. 
You can do the vanilla walk in layered animation too, here is a good video that explains it:


More on walks you can find in this link : http://www.youtube.com/user/AlejandroLuisGarcia
And of course within the books I already mentioned. Page 108 from the Survival Kit has a great recipe for a vanilla walk.

WEEK 9:

This week we took our blocking to spline, yay. And so out archenemy shows...the knee popping.... I swear it's no joke, the knees takes a lot of work hehe. Anyway the pose for the week was concern, here are my sketches:


And here is the 3d result:


The main thing my mentor said he wanted to see is the elbow supporting the head more (its difficult to do cause of the giant head :P ). Also suggested to move the camera a little so the table is not too distracting.

Here is how the animation turned out to be:


I was very happy my mentor liked it, there was a few little adjustments to do though. 
As for the knees I found out that tracking is the best way to go, if you are an AM student you can use the am tracker, if not there's this great tracker: http://www.creativecrash.com/maya/downloads/scripts-plugins/animation/c/arc-tracker that you can use. 
I myself did this for Ballie character:
Here's how I do it (not by any means its a the better way, its just the way I'm used to):

-Create 2 locators (menu: create>locator) and rename them so you don't get lost. (ex. loc_knee_r and loc_knee_l)

-go to the outliner and expand the ballie_etc, ballie_ac_rig and ballieac_dnt.

-select ballie_lo_R_knee (the geo of the right knee) and ctrl select the loc_knee_r locator that you created.

-with both selected go to constrain>parent and click in the little box to go to options, there make sure maitain offset is off.

-click in apply and the loc should always follow the knee now. If you can´t see the loc, just scale it until its visible.

-do the same for the other knee.

- now you can use the AM arc traker (or any other tracker) on the locators to see the path of the knees.

For a character similar to ballie you will have to look for the geometry of the knee and constrain the locator to that geo. 

For any character, including ballie you can constrain the locator to the joint of the knee. You might have to look for it on the outliner if its hidden but in most rigs you can see the joints and skeleton of the character.

After that it's a question of using stretch attribute of the legs to change its size slightly and make the knee always move forward during the animation and creating a nice and clean curve. 

As for the feet you can track the heel or ankle, or even the control of the foot in most rigs and track it. 


This is it, I'll not tell about last week as it's a blocking for the character walk, I'll wait after I finish the animation to post it here. Thanks for reading this immense post and hope you are liking my work. 

Class 2 is fast approaching and with it more complex characters :)

Peace!


April 21, 2013

Weeks 2, 3 and 4


Hi everyone, I did not gave up the blog. It's just this past weeks have been intense, which is great :)

First I would like to share this motivational video, I find it really inspiring, especially for those who are starting their artistic journey now:


So much to cover, I think I'll do it in topics : p


First I'll tell about the assigments.

Week 2:

This week we learned a bit about the 12 principles of animation: Timing and spacing, Squash and Stretch, Overlapping Action and Follow Through, Appeal, Staging, Solid Posing, Slow in and Slow out, Anticipation, Arcs, Straight Ahead and Pose to Pose, Exaggeration and Secondary Action. You can find more about each of them in these books:

"Illusion of Life" - read chapter 3;
"Drawn to Life, vol 1" - pag. 4;
"Character Animation Crash Course" - pag 75;
"How Cheat in Maya" - the first part of the book.

The first assignment was more of a warm up so you can establish a workflow and get used to the program. We had to go out and sketch away, any pose we found interesting we had to translate into sketches. We were supposed to do 10 poses and choose one for doing with Stu, the 3d rig we use for poses in class 1.
Here are my 10 sketches:


The chosen pose gives the idea of someone exhausted, it changed a bit when done in 3d, as we have many concern on how to convey our poses. We don't want to be symmetrical, it should have a nice and clear silhouette, a nice line of action and, of course. It must have appeal. With all this in mind and with help and feedback of all my AM friends I got to this result:


I was pretty satisfied when I turned it in, as I knew I had polished it to the best of my abilities with the help of my peers feedback. My mentor liked the actual pose, he said it was done, but also said I missed a few important very important things. The most important thing in a pose is it's meaning, what emotion you want to convey, the second is body mechanics, the believability of the pose, and for last is the design, how beautiful your pose is. He said that its all right to change the final pose compared to the sketch, as long as you don't change the meaning. In this case it changed from exhaustion to pain. He also gave a lot of suggestion of subtle changes that could be made to give back this pose it's meaning. I'll be reposting my work with all the fixes in the end of the term.


Week 3:

This week we learned the importance of planning your work. Some say that you should spend at least 25% of your time planning your shot. The most important tools for your planning are observation, video reference, thumbnails and feedback.

Observing life is a huge part of the animator world. You have to be able to understand how things move in real life before you can actually create the illusion in your computer. (and for non-animators out there...no, the computer don't do it for you :P )

Video reference: taking video reference, be that of films, youtube, or shot by yourself (which if preferible) is a great way to study a movement.

Thumbnails: Drawing is the best way to organize your ideas and visualize your poses. It's faster than doing it on 3d and you don't have to worry with details, Even stick figure can go a long way.

Feedback: If I were to mention one thing that AM has taught me in the last weeks, I'd say that how feedback is important for your work to succeed. It's amazing the difference in quality of your first raw idea and the one you get after you take the feedback of your peers. Animation is about team work, always remember that. So the more feedback you give, the more you will get and the more you will learn.
And don't stop with just animators, many times asking a non-animator for feedback is a great way to improve your work (A friend in AM named Derek showed me that. Thanks Derek).

Ok, now for the assignment:

This week was our first animation assignment, everyone was excited to make that the bouncing ball. We were asked to make a soccer ball or a basketball bounce. It could roll off screen or it could stop. We had a hundred frames to pull it of.

I chose the basketball and for it to stop in the screen.

Here's the planning for it:


The main problem with this plan is that if we get many bounces with the same amount of frames like bounces with 4 frames, it will appear to be a ping pong ball. But as I was doing the animation it got sorted out, some just by observation but huge parts cause of all the feedback I got :)
Here is the animation:


Overall my mentor liked the assignment and gave a lot of feedback to make it better :) I'll be sure to do it by the end of term. For now I should focus on each assignments :)
This result, again, and I'll keep repeating it, was reached thanks to the feedback of my peers.

The second part of the assignment was to make an excitement pose. The drill was the same as the first pose but now we had a clear goal.

Here are my sketches:


My mentor mentioned to make the sketches more close in proportion to the rig we are using. So I tried this new approach, I hope you guys like it. 
In the Q&A we were talking about staging and layout so I wanted to play with it a bit. My peers liked the camera angle of sketch 10 a lot too so I decided to go with that. 

Here is the result:


As I said I wanted to experiment with staging so I tried to put stu in a place more appealing than just the middle. I pushed the line of action as far as I could too and started to add a silhouette pic so it's easier to critique the pose. The main issue in this is that, a bird view camera make it difficult to determine if the character is on the ground and the level he is in. So I was told to avoid this kind of camera angle in the future. But all in all I liked this pose a lot, with this I experimented posting it for my friends in facebook to see if they could read the emotion I was trying to portrait, that was a great Idea Derek had, to ask non animators for a feedback too. It proved very useful!

Week 4:

Just sent my work for this week earlier today. This week was all about timing and spacing. One of the most important principles in animation. You can find out more about this principle in the books I mentioned in the beginning of this post.

This week assignment was to do a Heavy / Light Ball bouncing. We had 120 frames to do it and our mentor asked that both balls stopped while still in screen. We could choose to add a collision or not.

Here's my plan for the assignment:


Getting the weight of the light ball before and after the collision was ther hardest part. Still think I could have made it lighter after the collision but ran out of space and frames. Let's wait for the critique to see how I went :)

Here is the video assignment:


I worked in this video A LOT hehehe. And I have to thank all the wonderful suggestions and feedback I got from all my AM friends. Derek helped me a lot with the polishing, thanks a lot dude!!

Now all we have to do is work on the next assignment that is a Devastation pose and an animation of a pendulum. And, of course, wait for the mentor critique. The theme for week 5 is Overlapping Action. Francis Emvola was kind enough to direct me to this great tutorial that I hope will be of use for you guys as well. Thank you my friend.


Wow, sorry for the long post, I tried to be as brief as possible. So you guys must have noticed how I insist about getting feedback. And I will continue to do so, cause I know how important it is. Animation is a team work, it simple can't by just one person. There's just so much you can reach alone so get out there and be supportive and kind to your peers. It will pay off, you will learn a lot and make friends while doing so. That's one of the beauty of animation, it's a very humbling art form and you will never stop learning. Well, I think that's it for today, see you in the next post! Thanks for reading!

April 1, 2013

Week 1-2 - Sketches and the 12 principles

Hi everyone,

So, the first week of AM comes to an end. And a amazing week it was, full of anticipation!! The things I learned from this week will surely help me in the long run. First assignment was to explore the site, see some videos and introduce yourself to your peers. During this week I met amazing people, and everyone was in a collaborative mood. In conclusion, the best way to spend your first week is to try to meet lots of people, remember that they will be the ones to help and critique you, so be nice :)

Now we are starting week 2 and I'll wait for the and of the week to give any feedback. But I can say that this week is for us to discover the basics, the fundamentals, the principles. So it's a good week to go outside and just see the world.

The assignment is to choose a pose from 10 differents sketches that you have to make. As I already said, I suggest you go out and draw while you observe... well... anything you like really. At the and of this post there's my first drawings, and I know that they are not perfect, but I feel myself improving as I draw and that's a good sensation. I would recommend, if you have the time, to take pictures and draw a lot, beyond the number asked. In the end pick the 10 drawings you want to be at your assignment and choose one to pose Stu. 

Other thing I think I'll be doing is to read a lot of books about the 12 principles of animation. I'll suggest some here:

"Illusion of Life" - read chapter 3;
"Drawn to Life, vol 1" - pag. 4;
"Character Animation Crash Course" - pag 75;
"How Cheat in Maya" - the first part of the book.


For sketches, I suggest the book: Simplified Drawing for Animation from Wayne Gilbert.

You can always go to the Pratt twins for more tips and insights, their blog helped me greatly: http://twinsandtangents.blogspot.ca/p/class-1.html
Here are some sketches:


Cheers!!

March 25, 2013

Starting the AM journey :) / Começando a jornada do AM


Hi everyone!!!

Wow, last week was very busy, so I couldn't keep up with the posts countdown.
Anyway, the time has finally come to start the AM classes, in just a few minutes the site will open up and the journey will begin :)

Contratulations on all the AMrs starting this spring. Let's rock this term!!

-----------------------------------------------------------------------------------------------

Olá pessoal

Nossa, semana passada foi bem caótica, acabou que não consegui terminar os posts de contagem regressiva.
Mas, hoje finalmente chegou a hora de começar as aulas do AM, em alguns minutos o site vai abrir e a jornada começará :)

Parabéns a todos os alunos começando neste módulo!!!!

March 19, 2013

6 days - Maya tips / 6 dias - Dicas para o Maya


Hey guys and gals!

Here a well known Pixar short, I really like it :)

Today I'll be posting some basic Maya tips. Hope it will be helpful to everyone :)
But, before that, I would like to thank Varun from the AM Spring Crew for letting me use the groups file as a base, it will speed up the process and let me add more things. Thanks!!

Okay, here we go:


Basic Tools:

Select Tool (Q): Used to select objects easier (sometimes the other tools get in the way).

Q+ LMB- to select between different sets of selection (marquee to lasso) and others extra options.

Move Tool (W): Used to move an object. It alters the Tranlation Channels.

W+LMB- to select between local and world translate and others extra options.

Rotate Tool (E): Used to rotante an object in their pivot point. It alters the Rotate Channels.

E+ LMB- to select between local and gimbal rotations and others extra options.

Scale Tool (R): Used to rescale an object. It alters the Scale Channels.

R+ LMB- to select between local and relative scale and others extra options.

"+", "-" keys will reduce the size of move, scale and rotate tool


Outliner:


Today, I'll try stick with the basics controls and the viewport, but I'll make an exception with the outliner, as it is a essential window in Maya. Here you can find all the object in the scene (actually, you can list all the nodes). It's very useful for selection and organization. You can access the outliner through the menu "window -> outliner".


Selection:

Selecting multiple objects: Select a single object, hold down the "SHIFT" key and click on the others desired objects in the viewport. You can also select one object (or any node) in the outlaner, press "SHIFT" and click in another object and it will select both objects and everything between.

In the Outliner you can make a customized selection using the "CTRL" key. It will add to you selection or deselect if the object is already in the selection.

To deselect objects in the viewport hold down the CTRL key on the keyboard and click on the object.


Navigation:

Focus (F): Frame the select object in the viewport.

All (A): Position the camera to frame all the objects in the viewport.

"Space bar" to show up to 4 different panels, depending on your layout. Press again with the mouse cursor on top of the desired panel to expand it.

"ALT"+ "LMB"- Rotate in selected viewport

"ALT"+ "RMB"- Zoom in selected viewport

"ALT"+ "MMB"- Pan in selected viewport


Camera extra navigation tools: in the viewport go to the menu View -> Camera Tools, there's a lot of useful tools to help you with camera animation. If you want, I can do a guide of the diferent tools in the future.


Time Line

To move between key frames on the time line select an object that has key frames and press the "<,>" to move left or right on the time line.

To move between frames you can either click the "LMB" on the Timeline and drag, click "ALT + < or >" or press "K + LMB" and drag in any plane on the viewport.

To copy a pose from frame to frame: make sure you have the object selected and are at the frame with the pose you want to hold, or copy than press the "MMB" on the frame you want the pose to be copied (make sure you set a Key to "save" the pose).

Selecting keys: Hold "SHIFT" and press the "LMB" on the key you want to select. Your can drag to select multiple keys. After that you can scale the keys with the little yellow arrows, or move the keys in the timeline clicking and dragging with the "LMB".

Extras:

Set key (S): Set a key on all keyble attributes of the selected object on the current frame;

Undo: press the Z key.;

SavIng the Scene: Press "CTRL+S";

Low Poly mode: Press 1;

Smoothed mode: Press 3;

Wireframe mode Press 4;

No texture mode: Press 5;

Texture mode: Press 6;

All Lights mode: Press 7, this is very important to animatiors. What this actually does is switching off the default lighting and enabling all other lighting in the scene. As we, generally animate with no lights, everything will be dark and in contrast with the background. This is great to check your silhouette.

Guess I'll stop here for now. I'll add the second parte tomorrow. If you have any suggestion or correction please share :)

Cheers!

----------------------------------------------------------------------------------------------------


Olá pessoal!

Este é um curta bem conhecido da Pixar, eu adoro ele :)

Hoje eu vou postar algumas dicas básicas do Maya. Espero que sejam úteis para todos :)
Mas antes vou agradecer o Varun, parte da turma de Março 2013 do AM, por deixar eu utilizar o arquivo do grupo como base, isso vai agilizar o processo deixando eu adicionar mais coisas. Obrigado!

Ok, aqui vamos nós

Ferramentas Básicas:

Select Tool (Q): Usado para selecionar objetos de modo mais fácil (algumas vezes as outras ferramentas ficam no caminho).

Q+ LMB- para abrir o menu com novas opções de seleção.

Move Tool (W): Usado para mover um objeto. (ela modifica o canal Translate)

W+LMB- para selecionar o modo de funcionamento da ferramenta e outras opções extras.

Rotate Tool (E): Usado para rotacionar um objeto de acordo com seu ponto de pivô. (altera o canal Rotate).

E+ LMB- para selecionar entre as formas local e gimbal de rotação, assim como outras opções extras.

Scale Tool (R): Usado para rescalonar um objeto (altera o canal Scale).

R+ LMB- Para selecionar entre o modo local ou relative, assim como outras opções extras.

"+", "-" podem ser usadas para aumentar ou diminuir o tamanho das ferramentas.

Outliner:

Hoje eu vou me ater aos controles básicos e a tela principal do Maya, mas vou abrir uma exceção para o Outliner por ele ser muito importante e simples. Aqui você encontra todos os objetos da cena ( na verdade você consegue ver todos os nós). Isso é muito útil para seleção e organização de objetos. O outliner é acessado através do menu "window - > outliner".

Selection:

Selecionando múltiplos objetos: Selecione um único objeto, segure o "Shift" e clique nos outros objetos desejados na viewport. Você pode também selecionar vários objetos no outlook utilizando o a mesma técnica, lá o Maya vai selecionar todos os objetos entre os dois que você clicar, incluindo estes.

Ainda no Outliner você pode fazer uma seleção mais customizada utilizando o "CTRL" ao invés do "SHIFT". Com essa tecla apertada você pode selecionar ou deselecionar qualquer objeto no outliner.

Para deselecionar objetos na tela principal, basta segurar o "CTRL" e clicar no objeto desejado.

Navigation:

Focus (F): Foca no objeto selecionado.

All (A): Posiciona a câmera para que se possa ver todos os objetos da cena.

"Espaço" Mostra até 4 painéis na tela principal. Aperte mais um vez com o cursor no painel desejado para expandi-lo.

"ALT"+ "LMB"- Rotação da câmera

"ALT"+ "RMB"- Zoom.

"ALT"+ "MMB"- Pan

Controles de câmera extras: na viewport vá no menu View - > Camera Tools. Vou adicionar um guia para estes controles no futuro.

Time Line

Para mover entre os keys basta utilizar as teclas "<,>"

Para mover entre os frames você pode clicar e arrastar com o botão esquerdo do mouse na própria timeline ou manter pressionado o ALT enquanto usa as teclas "<,>" ou ainda manter pressionado a tecla K, clicar e arrastar na viewport com o botão esquerdo do mouse.

Para copiar a pose de um frame para o outro basta, com o objeto selecionado, colocar no frame com a pose desejada e depois clicar com o botão do meio do mouse no novo frame ( não esqueça de criar uma key para salvar a pose).

Selecionando keys: Basta manter pressionado o "SHIFT e clicar na key, você pode arrastar para selecionar várias keys. Para move-las basta clicar na parte vermelha e arrastar. Para escalona-las pode-se utilizar as setas amarelas.

Extras:

Set key (S): Cria uma key em todos os canais no frame atual;

Undo: tecla Z.;

Salvar: precione "CTRL+S";

Low Poly mode: Tecla 1;

Smoothed mode: Tecla 3;

Wireframe: Tecla 4;

Modo sem textura: Tecla 5;

Modo com textura: Tecla 6;

Ligar todas as luzes: Tecla 7, isso é muito importante para animadores. Ele desliga a luz padrão do Maya e liga todas as luzes criadas. Como animadores geralmente estão trabalhando numa cena sem iluminação, tudo  vai ficar escuro, criando um contraste com o fundo e possibilitando que se veja a silhueta.

Guess I'll stop here for now. I'll add the second parte tomorrow. If you have any suggestion or correction please share :)
Acho que por hoje é só, amanhã irei postar a segunda parte. Qualquer sugestão ou correção por favor é só comentar :)


Até logo! 

March 18, 2013

7 days - / 7dias


Hey, hope you guys are doing great!!

Funny little short, don't you think? It's called "One More Beer" and it was made by Pedro Conti. Check out the official site: http://www.onemorebeer.pedroconti.com/.

Sadly, I'll have no time to post something more useful today. But Tomorrow I'll try to compensate :)

So, what should I write about? A small Maya guide with enphase to animation? Anything suggestion?

For now why don't you guys check this program out? It's a 2d animation software called Pencil. Not as good as Flipbook, but it's free and you can do a lot of things nonetheless.

Cheers!!

------------------------------------------------------------------------------------------


Hey, espero que todos estejam bem!!

Curta engraçado não é mesmo? Se chama "One More Beer" e foi feito por "Pedro Conti". Página oficial: http://www.onemorebeer.pedroconti.com/.

Infelizmente, não terei tempo de postar algo mais útil hoje. Mas amanhã vou compensar :)

Então, sobre o que eu deveria escrever? Um guia simples do Maya voltado para animação? Alguma sugestão?

Enquanto isso olhem este programa. É um programa de animação 2d muito útil. Não é tão completo como o Flipbook mas ele quebra um galho.

Até mais pessoal!!

March 17, 2013

8 Days - Books / 8 Dias - Livros


Hi, everyone. how are you today?

Today's short film is called The Fantastic Flying Books of Mr. Morris Lessmore made by Moonbot Studios, you can find out more about it here: http://www.morrislessmore.com/.

Okay, now for today's post. I decided to share a list of books that have been very helpful to me. I will list only the ones that I at least had the opportunity to look through. 


  1. I'm pretty sure this one does not need an introduction. A must have for any animator at any stage of education. An animation bible.

  2. Another book that is invaluable to any person in our craft!

  3. This will help you greatly in understanding the powerful animation tools Maya have. It's written in a simple fashion, easy to understand. Even if you have experience with Maya software, I recommend reading it, you will find new ways to use various tools so you can speed up your workflow. And it has scene files to help you learn the concepts.

  4. Written by the legendary Eric Goldberg, this is a great book to learn more about animation. It covers all animation principles, and comes with a cd full of examples of what is explained in the book.

  5. Another great animator, Preston Blair  wrote this book. In all animation books it's very important to practice as you read. I feel this is especially true for this one, as the author prefer to show us more than tells what to do. It's a very visual book, and will help you greatly.

  6. Simplified Drawing for Planning Animation by Wayne Gilbert
    Great book teaching how to draw in a simple way so you can plan your animation. I did not post a link to amazon as the price there is outrageus (more than $100). The official website sells it way cheaper, but it's out for a while, I do not know if it will come back. If you can find it at a fair price, I recommend getting it :)

  7. I did not have the time to take a good look into this, but it's supposed to be a great asset in learning how to draw.

  8. Shamus is the animator who did the dwarves in Snow White. It's a great book to learn all the process of a production animation.

  9. I do not know if there's a english version of this book, I didn't find any. But for those of you who know portuguese, it's a good book to learn human behavior and body language. (the author is originally french, so it might be a french version out there.)

I think it's good for now. As I get to read more books I'll post here. I suggest reading all of the Animation Survival kit at first, than reading and studying the How to Cheat Maya. After that, if you don't draw, I would read all the Simplified Drawing for Animators once and then reading it again from back to front doing the exercises. The rest you should study at your on pace and discretion. If you are enrolled at am animation school, it's good to study the books by topic as you progress into the program, I think that way the knowledge will sink better at your head. But it's just my suggestion, every person have his/her own way to study :p 

Do you guys have any suggestion?

Cheers!

Contributions:

Drawn to Life by Walt Stanchfield
Sérgio Dias, reminded me to add these, there's 2 volumes of pure awesomeness!! Can't believe I forgot to add. Thanks Sérgio!

Ideas for the Animated Short by Karen Sullivan, Gary Schumer, Kate Alexander
Another contribution of Sérgio, great for people that want to make a short :)

Stop Staring: Facial Modeling and Animation Done Right by Jason Osipa
This one was a suggestion of Derik Annan, another member of the spring class crew. Thanks Bro!

-------------------------------------------------------------------------------------------

Olá pessoal, como vocês estão hoje?

O curta de hoje é chamado The Fantastic Flying Books of Mr. Morris Lessmore feito pelo Moonbot Studios vocês podem saber um pouco mais sobre ele aqui: http://www.morrislessmore.com/.

Eu decidi compartilhar uma lista de livros que tem sido de grande ajuda pra mim. Vou listar apenas os que tive oportunidade de pelo menos dar uma olhada.
  1. Tenho certeza que todos vocês conhecem este livro, é leitura obrigatória para qualquer animador em qualquer estágio de aprendizado. É considerado a bíblia da animação.

  2. Outro livro q dispensa comentários.

  3. Este livro vai ajudar-los a entender melhor as poderosas ferramentas do Maya. Ele tem uma linguagem simples e fácil de entender. Mesmo que você já tenha experiencia com o Maya, eu recomendo a leitura, tenho certeza que encontrará novas formas de utilizar as ferramentas de animação do Maya para agilizar seu workflow.

  4. Escrito pelo lendário Eric Goldberg, este é um ótimo livro para se aprender mais sobre animação, ele cobre todos seus princípios e vem com um cd contendo exemplos das lições.

  5. Outro animador incrível, Preston Blair escreveu este livro. Em todos os livros de animação é importantíssimo praticar enquanto lê para se entender o conceito. Neste livro eu acho isto ainda mais importante, o autor escolher um caminho muito visual utilizando poucas palavras. É um ótimo livro e vai ajudar bastante.

  6. Simplified Drawing for Planning Animation by Wayne Gilbert
    Livro muito bom para se aprender a desenhar de modo simples para se planejar uma animação. Eu não coloquei o link do amazon porq o preço lá está um absurdo. O site oficial vende muito mais barato, no entanto ele está fora do ar a tempo já. Se você conseguir acha-lo por um preço razoável, compre pois vale muito a pena.

  7. Eu ainda não tive muito tempo de dar uma boa olhada neste, mas ele é muito recomendado para quem quer aprender a desenhar.

  8. Shamus é o animador que fez os anões da Branca de Neve. É um ótimo livro para se aprender os passos de uma produção.

  9. Este livro é ótimo para se aprender linguagem corporal e comportamento humano.
Eu acho que é isso ai pessoal, pelo meno por enquanto. Quando eu ler e descobrir mais livros eu vou postar aqui. Eu sugiro ler o Animation Survival Kit inteiro, então o How to Cheat Maya. Depois disso, se você não sabe desenhar leia o Simplified Drawing for Planning Animation uma vez e depois leia de novo na ordem invertida fazendo os exercícios. O resto fica a critério de vocês. Se você está matriculado em alguma escola de animação eu sugiro que estude os livros por tópicos de acordo com o programa, acredito que assim vai aprender mais. Isso tudo é apenas uma sugestão, eu sei q cada um tem um jeito próprio de estudar :p

Vocês tem alguma sugestão? 

Até logo!


Contributions:

Drawn to Life by Walt Stanchfield
Sérgio Dias, me lembrou desses livros, são dois volumes incríveis. Muito útil, nem acredito q esqueci deles. Obrigado Sérgio!

Ideas for the Animated Short by Karen Sullivan, Gary Schumer, Kate Alexander
Outra contribuição do Sérgio, ótimo para pessoas que querem fazer um curta :)

Stop Staring: Facial Modeling and Animation Done Right by Jason Osipa
Este é uma indicação do Derik Annan, outro membro da equipe que vai começar a aula agora em março. Obrigado Bro!